March 28, 2012

Constructing a Sprocket

When you have six paddles, you can join them to a hexagon for one whole Sprocket. It's really exciting to have a Sprocket come together in your hands!


One by one, I sew a paddle to each hexagon side. I use the same ladder stitching described in the last post, but whipstitching will work just as well if that is your preference. Occasionally a paddle is just a bit longer than the hexagon side. I just center it and sew it on, it always seems to work out fine for me.


I leave the edges between the paddles free until I've sewn a paddle to each side of the hexagon.


Once all six paddles are attached, I remove the paper hexagon template. Then I am free to fold the Sprocket in half, which makes it possible to join paddles together. Where many points come together I will often take an extra stitch or two into neighboring diamonds, just to make sure there is no gaping at the intersections. Let your instinct guide you on this.


The fuzzy picture above is supposed to show just now nicely those seam allowance "flags" on the diamonds nestle together and just fan around at the back. Nice and flat, nothing to worry about.


And there you have it! A real live Sprocket. Now I'm just gonna do this, oh, 22 more times or so and I'll have enough for a quilt! I'll pop in every now and then to share my progress, and once I get to the point of dealing with the sides I'll show you how I do it. But for now, it's time to piece at our own pace....

For my friends embarking on Sprockets with me, I hope you enjoy the journey! The full list of posts for the quilt along is here.

March 25, 2012

Piecing together paddles

So, continuing on the EPP adventure, this is the next step after you've basted some paper pieces.  Each Sprocket:


is made from six paddles:


The paddle structure came from watching Jessica's EPP video in which she uses a similar structure to start her star units. A paddle has three background and three colored diamonds.


I start by laying out my pieces. I use a single piece of thread to work around the diamond and close up one side. Then a second piece of thread closes up the second side and attaches that extra diamond hanging off the right. 

I join my pieces with a ladder stitch. I think it's fast, I like that the thread isn't visible, and it's just what I'm good at. If you'd rather whipstitch pieces together, (and I think most English paper piecers do it that way) no problem! You'll still join your pieces in the same order.


I start my ladder stitching by putting two pieces wrong sides together. I use a paper clip to hold the pieces together while I get started, and I make sure any seam allowance flags are tucked down behind the pieces.They will just nestle against each other back there and not cause any trouble once the piece is opened flat.


I put a knot in a piece of thread, and bring it up through a seam allowance to emerge from the point (the orange diamond in the picture above). Then I alternate taking a stitch into one shape and then the other. Where the thread emerges from one fabric, it dives immediately into the other. The stitches are taken just to the inside of the edge of the shape.

You can do this stitch by stitch if you want, but what makes it fast is being able to take several stitches in a single pull of the needle. In the picture below I have four stitches on the needle. Note: I have a full description of ladder stitching paper pieces, but at the time I posted it I hadn't yet had the epiphany about putting the pieces wrong sides together to allow for stacking stitches on the needle this way. It's worth a read if you need a better description of what the thread is doing though.


Whenever I get to the end of the side I'm stitching, I flip the shapes out flat and make sure the thread is snug. Sometimes I will take an extra stitch to make sure the pieces are joined well at the point. Then I tie a knot into the back side of one of the pieces and without cutting the thread, I bring it back out through a point to start the next side.


When all four sides are sewn around the center diamond I don't cut the thread, because I can use it to sew one more side. I remove the paper shape from the center diamond. Now I can fold the paddle in half horizontally to sew the first flappy side seam with the thread I am still working.

Finally, I start a new piece of thread and I sew the other flappy side seam, and then add the final diamond.


And that's a paddle! Get six of these and you're ready to make a Sprocket: the full list of Sprocket Quilt Along posts is here. Next I'll cover how to make a Sprocket and then I swear this won't be the EPP channel anymore!

March 21, 2012

Basting your paper pieces

Oh thank goodness we're at the part where we get to play with the fabric. I'm going to show you how I baste my shapes for the Sprocket quilt.

To baste the diamonds I start with paper clips on two sides (these really make EPP so much easier, thanks for the hot tip about paper clips, Jessica!). I thread a needle, without knotting the thread. I take a backstitch through both layers of fabric at the point, leaving a long tail. I don't pierce the paper.


I turn the diamond and fold down the next side. The seam allowance should "flag" out to the side. On the way to the next point I take a little running stitch into the seam allowance, to make sure the thread behaves and to keep the shape taut. Another backstitch at the point, again, through both layers of fabric but not the paper. Turn and repeat around the diamond. I make sure the thread is snug as I go.


When I get back to the starting point I take a final backstitch and leave a tail of thread. Again, I don't tie a knot. The paper template stays inside the shape until it's been joined to other pieces on each side.Then I'll remove the paper and reuse it.

If you prefer to stab through the paper (just a preference thing) you only need a few stitches. Don't overdo it.

When I baste diamonds through the paper, I go down through the point and up in the middle on each side. I typically knot my thread tails together at the end but I'm not sure that's necessary. Basting through the paper means you'll need to remove your basting stitches to take the paper template out (if you only baste through the fabric, like in the first example, you'll be able to leave the basting stitches in).


To baste the hexagons, I use paper clips on all sides, then take just a few stitches per side.  I do stitch through the paper with these, because they are so big.  I knot my thread tails together at the end too. These giant hexagons go quick.


Basting a little bit here and there adds up! Pretty soon you'll have enough to make a Sprocket. The list of all the Sprocket quilt along posts is here.

March 20, 2012

How to love English Paper Piecing - a guest post from Jessica at Life Under Quilts

Today I'm quite happy to feature a guest post from Jessica at Life Under Quilts. I have learned a lot from her and enjoy reading her blog so much. It was the photos of her working on English paper piecing everywhere that got me thinking that I too could construct a quilt this way. Thank you for sharing your wisdom, inspiration, and lovely photos Jessica!


Hello all~

Christina knows I’m an EPP addict so she asked me to share my secrets on how I fit this type of hand piecing into my busy life. Let me start by saying that anyone can do English paper piecing! If you’ve never tried it, I highly encourage you to start. It’s a great gateway into playing with shapes and color in ways you may not have tried before. Plus, sewing up tons of small patches equals a great way to display your stash and use up some scraps.


So here are my tips for how to love EPP:

Step 1: Be organized. Have a sewing kit ready with your templates, thread, and cut fabric. Add in anything else you need to sew comfortably (Chapstick? Beeswax? Paper clips?) When you’re prepared you won’t find yourself wasting precious sewing time searching for your thimble. Christina gave a great tutorial for constructing a sewing kit in this post.


I use a plastic box that I can toss in my purse or leave in the car, just in case. I also like to save a picture of my plan/pattern on my phone so I can reference it on the go!


Step 2: Break up the steps. Don’t baste (or even cut) all your fabric at the beginning. Find a balance with the different steps (cutting, basting, piecing, joining sections) so you don’t lose motivation. You never know, as your project grows, you may want to add in or substitute out a fabric that you hadn’t originally planned on.


Step 3: Don’t leave home without it! You can piece anywhere! All that time you currently spend playing on your phone while you’re waiting at soccer practice, swimming lessons, or the doctor’s office could be spent making beautiful quilts. And quilting in public gives you a chance to meet people and strike up conversations you may never have had. Most of my latest EPP quilt was pieced while my son was napping.


If you haven’t already, I suggest choosing your fabrics for Christina’s Sprocket QAL. I’m going to head up to the sewing room and see what fabrics want to be in mine.

Thank you again Jessica, you are a true inspiration! And let me refer anyone getting interested in English Paper Piecing to Jessica's own EPP quilt along. I'll be back tomorrow with a post on basting paper pieces.

March 15, 2012

Cutting fabric for Sprockets

Here's good news: with english paper piecing, it's the paper that needs to be cut precisely, not the fabic. Yay! So don't stress this part. Cut some fabric so you can get on to the sewing.


Diamonds are pretty easy, and you get to practice using that 60 degree line on your ruler. Start by cutting your fabric into strips 2 1/2'' by the width of the fabric (though if you don't have the whole width, shorter strips can be cut in the same way).

Lay one strip on your cutting board along a horizontal line, with the folded edge to the right. Put the folded edge halfway between two inch marks. Lay the next strip just above this one, but place its folded end 1 1/2'' farther than the first strip. Repeat with consecutive strips. I was able to cut six strips at once.


Line up the 60 degree line with the bottom of your first fabric strip, so that the ruler hits the bottom edge of the fabric strip on the inch mark, and just cuts off the folded edge at the top. It should align to cut off the folded edge all the way up your stack of strips.


Then move your ruler 3 inches to the left. Make sure that 60 degree line is even with the bottom. You can double check to make sure the ruler is hitting the top strip about three inches from where your last cut landed, for reassurrance that you are holding the correct angle. Make this cut all the way up the stack of strips. Keep going down the strip, making angled cuts every three inches.


I got 12 diamonds from each strip of standard width fabric. Cutting six strips together, that's 72 diamonds at a time. This part was fast and fun for me. I probably cut half of what I need before I just had to start basting them!

Now for cutting hexagons, first you make a cutting template. I just used some scrap paper. Tape one of your paper hexagon templates to the scratch paper and then use your see through ruler to mark a line 3/8'' away from each edge. Now you have a new, larger hexagon for cutting your fabric. You can use this same approach to cutting a single diamond template which is perfect for scraps or fussy cutting.


I laid the cutting template on my fabric and cut out one hexagon with the flat edge just above the selvage edge of the fabric. Then I moved the cutting template up and to the right so it was flush with the hexagon I just cut, like in the picture below. Then back down to cut another along the selvage edge, all the way across the 1 1/4 yard piece of fabric. . I went in horizontal rows back and forth until I had cut out 25 whole hexagons.


I saved all the odd shaped bits in case I can use them for finishing at the end. I also cut five half hexagons, by folding the template in half point to point. Make sure to add a seam allowance along the long edge.


Of course, you can also cut your hexagons one at a time, as you need them.

Feel free to ask questions if these instructions aren't clear! It's my first time doing a big EPP project and so I won't be surprised if I leave something out. (P.S. the main quilt along post is here, with links to all the posts so far)

March 13, 2012

Making your own english paper piecing templates

Well this is what blogging will do to you. I would have been perfectly happy just ordering my paper pieces online and doing my little project. But with a blog I have this sense of responsibility. What if I get someone excited about the pattern and they can't buy the templates? So I've wrestled with my ruler and printer and found simple-enough solutions to share.


For the diamonds: You're going to want about 500 of these dudes unless you join your units as you go, and even then you'll need a few hundred. So let's rustle up some scrap paper. Using either 8.5'' x 11'' or A4 paper, you should get 15 diamonds on each page that you print. You can actually get 30-60 diamonds for every printed page though, if you use the little trick below. 

First, go here. Choose your paper size. Change "minimum border" to 0. Change "block size" to 2 inches. Download the pdf, then go to print the document. Make sure that the "page scaling" setting is set to "none". When it's printed, measure a side of one of the diamonds and make sure that they have in fact printed at the right size.

Now get another 1-3 pieces of scrap paper, and put them under your printed sheet. Staple the pages together. Cut out carefully along the lines with sharp scissors. You may decide to use thicker card stock paper, and if so you'll probably want to cut just two sheets at a time, but I was able to accurately cut four sheets of regular weight paper at once.


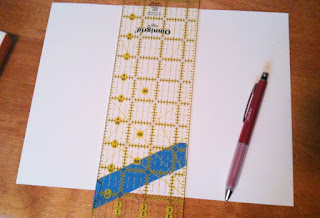
To draft the hexagon: you need a piece of paper, a pencil, scissors, and your ruler. You'll see that there is a piece of painter's tape just beneath the 60 degree line on my ruler. This made it easier to see and also provided a slight edge that made aligning with the edge of the paper easier. I recommend it.
So, make two marks, four inches apart, centered on the long edge of the paper. This will be one side of the hexagon.


Now line up the 60 degree line with the bottom of the edge of the paper, and use it to draw a right-leaning line through the right-hand mark (the 60 degree lines lean opposite ways on opposite ends of your ruler, so if the one end isn't angled the way you want, flip your ruler around).


On that line you just drew, make a mark exactly four inches from the mark at the corner.

Now repeat the last two steps, making new angled lines and marks four inches from the last. Repeat until you have six sides. If your last line goes through your first mark, you did it!


To cut out several at a time, lay a few pieces of paper underneath, and staple together in a few places before you start cutting. Mine matched up almost exactly with the ones I ordered online.


The test: do two of your diamond sides equal one of your hexagon sides? Perfect.
However you get your paper pieces, I'll be back to walk you through cutting the fabric soon!

March 08, 2012

Sprocket quilt along: the details

I named this pattern Sprocket after seeing the first finished unit. It just seemed to fit. Plus, it's the name of my uncle's cat!


I'm really enjoying working on it. I'm so glad I took the time to plan out a handwork project. It turns out I have a few minutes here and there for hand stitching and it's great to have something ready to go when they happen. In case you'd also like to try this pattern I'll give the how-to step by step.

Here are the posts I've done so far:
Making a travel sewing kit
Making your own paper piecing templates
Cutting fabric
How to love English Paper Piecing
Basting Paper Pieces
Piecing Paddles
Constructing a Sprocket

Background

I'm using a method called English paper piecing. This means I wrap fabric around paper and temporarily baste it to hold it in a particular shape. After stitching those shapes together, the paper is removed. Simple precision patchwork by hand. Low stress. Go at your own pace.
The pattern requires two paper shapes: diamonds and hexagons. Both these shapes are measured by the length of one side. I'm using two inch diamonds and four inch hexagons. Of course, the pattern would also work in different sizes, as long as your hexagon sides are twice as long as your diamond sides. Thank you, geometry, for being so cooperative.

Layout


My quilt will have five vertical columns. Each column will have five and a half of the sprockets. Total: 25 full sprockets, 5 half sprockets. Why the half sprockets? I like the extending-off-the-edge look of my mockup.


The finished quilt should be 63 x 76 inches. Maybe you want a different size. This info will help you plan it:


Paper requirements:

A sprocket takes 36 diamonds and one hexagon. Once it's constructed, you can remove the 18 inner diamonds. The outer 18 will stay in until you've sewn all the edges around them.
I ordered paper piecing templates from here. They are so quick to ship. I ordered 500+ 2-inch diamonds and a small batch of 4-inch hexagons. They are the six point (60 degree) diamonds. If you just want to try the pattern you could get a small bag of 75 diamonds and draft your own hexagon (not hard, I'll show you how). You can finish three hexagons with that one bag, probably enough to know if you want to continue.
You could cut your own diamond templates instead. Sounds tedious to me, but we'll get to that.

Fabric requirements:

Hexagons: 1.25-1.5 yards (I easily got mine from 1.25 but it never hurts to have a little extra just in case!)
Background for 445 diamonds and finishing the edges: 3.25-3.5 yards.
Sprockets: you'll need 450 colored diamonds. You can get this from 15 fat quarters (30 diamonds per fat quarter) or 38 strips 2.5 inches wide (12 diamonds per strip)

Ok enough with the numbers. Back to sewing!

March 02, 2012

Travel Stitching: paper piecing kit and tutorial

I'm getting excited about my trip to San Francisco, and getting ready to kick off a little quilt along. Here's a tutorial for a simple sewing kit geared toward the English paper piecer. It's got a little stiffness. It's got two big pockets in case you're working on something large. It closes easily with an elastic band. It's quick to make.


The size is a bit arbitrary, based on the interfacing I had available. But since it's basically just a double sided piece of fabric folded in at the ends, you could adapt it to whatever size you want. I have been using this all week though and it is working well.


In mine I included a little tin with essential supplies. I epoxied a bit of felt on the inside for my needles and pins. A spool won't fit in this tin but it's perfect for bobbins. Also included is a thread cutter for airport-security-approved sewing. You could use nail clippers instead if you don't have a thread cutter.


Gonna make one? You need:

Outer and lining fabrics: 29 1/2'' x 10''
Small elastic hair band
Button (thrilled to finally have a use for this awesome vintage button)
Stiff interfacing: 2 pieces 7 x 8.5. I used Fast 2 Fuse, because I had it. You could also use something like Timtex. Or just cut up a cereal box. No biggie. You just want a little structure in there.


I have only a few pictures here. The thread I used is the exact same color as my linen so it was hard to see and therefore pointless to photograph. Luckily, this project is dead simple even without pictures.

1. Lay your outer and lining fabrics right side together. Sew both the long sides and one short side with a 1/4'' seam. Leave the other short side completely open.

2. Clip the corners, then turn right side out and press the edges.

3. From the finished short edge, mark a line 6 1/2'' in on the lining side. Stitch along this line. Insert a piece of interfacing.

4. From the last line you stitched, mark a line 7 1/2'' in. Mark another line 1/2'' from that. Stitch along both these lines. Insert the other piece of interfacing.

5. From the last line you stitched, mark a line 7 1/2'' in. Stitch along this line.

6. Turn in the open side of the pouch 1/2'' and press. Topstitch this edge closed. Topstitch the other short edge too, so it matches. If you used a fusible interfacing you can fuse it now.

7. Figure out which side you want to be the back. Attach your elastic band to the middle of the back side stitching line with a zig zag stitch. It should point toward the center lines. 


8. Fold in both short edges along the lines of stitching. Press. Pin/clip and topstitch around the entire pouch. Add the button wherever it needs to go based on the button and elastic hair band size.


I like that I can fold it back on itself for a smaller footprint. I like that it looks simple and not overwhelming visually.


I've used this over the week to stitch at work and at home during a occasional slow moments. It's nice to get a little sewing time even when I can't possibly be at my machine!